This sounds like the ideal photo shoot, right? Not so much.
Although Venice Beach is one of the most photogenic spots in California, the lighting conditions that morning were less than ideal—it was a bit dark.
Back in the days of film, I would have had to either set up some artificial lighting and cumbersome reflectors or reschedule for a prettier day. That’s certainly tough when your client and subject is a globetrotting traveler!
However, thanks to the magic of digital camera technology and—in particular–
Lightroom editing software, I knew it would be fine even though I literally had just one shot on this overcast day.
I love Lightroom. In fact, I’d say it’s my second favorite part of photography. (The first, of course, is the photo shoot.) Editing in Lightroom breathes life into your pictures. And best of all, it does so very quickly.
Here’s a tip: First of all, I shoot the photographs in the RAW file format. This allows me to have better control over the image. With this format, I have more options for editing the photo afterward—such as lowering shadows and bringing in highlights. That’s because a RAW file retains much more data and integrity than a JPG.
I tend to shoot in manual mode and attempt to capture the right exposure—although that doesn’t always happen. With RAW, if I over- or underexpose the data, there is plenty enough there to play with in Lightroom.
I was certainly thankful to have enough data to edit the photographs from my shoot with Stefania. But don’t just take my word for it—check out the difference.
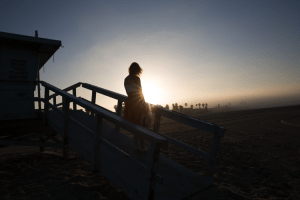
Here’s a “before” shot:
Although I lucked out in capturing the sunrise and some great angles in the composition, overall, the photo is too dark.
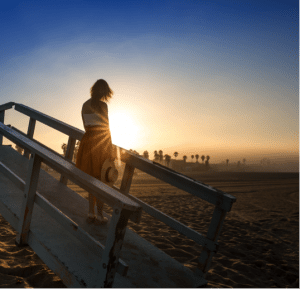
With just a little bit of editing in Lightroom, I was able to quickly turn that dark photo into this bright image of a Southern California sunrise:
That’s much more like it. By accentuating the highlights, making some eye-pleasing crops, and bringing out detail in the shadows, we now have a nice, bright photo worthy of a high-fashion magazine… or an international travel and fashion blog!


